Importing and Exporting Catalogue Items

Overview
A quick guide on how to add and update or delete Catalogue Items in Affino. You can also export them using different filters such as Zones, Channels, Sections, Currencies and more.
These are normally limited to your Security Administrator to protect Company data.
Recommended procedure:
- For importing Catalogue Items, it is important to have the site structure set up where your Catalogue Items would live before importing them
- Also important to set the Store Profile with the right settings such as Currencies, Checkout Profile and other configurations
- Please use the latest sample file (available by clicking on Help > File > "download a sample xlsx file here"
Before you start - useful tips
Affino imports
You will need to use the standard Affino import templates which are found in the Help text next to the Import Menu. Always download the template when you are preparing an import file as it may have changed since you last saved the file locally. (for example, adding a new column to support a new field in the Database).
Import files can be up to 100mb in size in a xlsx format.
Once the file has been uploaded, you will see an on-screen message 'The import has been scheduled and you will be emailed when it is complete'.
The email will contain an itemised list per row, of any errors encountered, with help messages.
For the number of pricing columns used, you no longer need to have all four groups of pricing columns if you have fewer prices set on each of the items. This is especially useful when round-tripping catalogue items (i.e. exporting, updating and re-importing them).
Important - the column titles in the import file cannot contain any spaces. It is not necessary to edit the row containing the columns (these are the actual table names in the Affino Database).
Affino exports
Once you have requested the export, you will see an on-screen message 'The export has been scheduled and you will be emailed when it is complete. The email will have a link to the file in Affino.
Import and Export filters
There are a number of different filters which you can apply when importing and exporting, it is useful to read up on these to be sure you have selected the rights ones, if any.
Add, update and delete mode
The imports can be run in two modes.
Add and Update
This will insert new records to Affino and generate the unique Catalogue Item code. The Update action allows you to replace the information stored against the Catalogue Item. You will need to include the CatalogueItemCode otherwise it will insert a new record.
Delete
When you wish to delete records from Affino.
Catalogue Item Import
Control > Commerce > Catalogue Items Import
Click on the blue Help button and download a full sample XLSX file.

Here are some of the key fields, with a help text, that you'll need to set up in order to run the import:
- Target Zone(*) - Catalogue Items will be imported / updated /deleted in the selected Zone
- Section - Select the destination section for the import (selecting this will overrule SectionName in the XLSX)
- Multi Display - Select the sections to multi-display items into (selecting this will overrule MultiDisplaySectionName in the XLSX)
- File(*) - Select the XLSX of Catalogue Items that you wish to upload. File size Limit: 100MB. You can now use the CatalogueItemCode as the import identifier. If it is included then it will be used as the primary key, otherwise, the CatalogueId will be used
- Action(*) - Select Action: Add will add the row's contents to the system / Delete will remove the row's contents from the system
- Text To HTML Formatting : Select to convert non-formatted text into HTML. Affino will automatically convert rows with two-line spacings (carriage returns) into paragraphs, and those which only have one separating them into lists
- Presentation Style(*) - Select from the drop-down menu the presentation style for this item
- Security Clearance - Use the drop-down menu to select which user group has access to these Items
(*) - Required
Note: If Text To HTML Formatting is checked the import will process the following text columns:
- Introduction
- MainDetails
- AdditionalInformation
- SpecialOffer
- Text4
Catalogue Item Export
Control > Commerce > Catalogue Item Export
Use the on-screen filters to export by:
- Type(*) - Select Catalogue Item Type you want to Export.
- Currency - Select to Export Catalogue Items by Currency.
- Zone - Filter the export by a Zone.
- Channels - Filter the export by Channels. Select any number of product channels you wish to filter by.
- Section - Select Sections from which Catalogue Items should be exported.
- Topics - Select the topics you wish to filter the Catalogue Items on.
- Apply Sale Start Filter - Select to Apply Sale Start Filter.
- Sale Start - Select Sale Start date to Export from.
- - Select to Apply Sale End Filter.
- Sale End- Select Sale End date to Export until.
- On Sale(*) - Select to Export Catalogue Items which are on Sale.
Summary of Columns
Summary of Columns
CatalogueItemCode - The unique CatalogueItemCode assigned by Affino when you create or import them. This needs to be blank when you are importing new records. If Update or Delete, you need to include it.
CatalogueID - This is your own alphanumerical reference for this Catalogue Item.
CatalogueItemName - This will be the name of the catalogue item you are going to create/update or delete.
ProductLine - If set, select the required product line for this Catalogue Item.
ProductCategory - If set, select the required product category for this Catalogue Item.
AssociatedCatalogueItemCodes -
CatalogueGroupCodes -
CatalogueGroupTitle - Enter the title to be displayed on the basket when this item is part of a Catalogue Group (this is needed to differentiate between the items within a Catalogue Group)
CurrencyCode1 - Enter the Currency code. It needs to be the ISO code, which can be found on the Currency control screen.
Price1 - Enter the price amount. A Catalogue Item has a Price Matrix, the number indicates the row of the grid.
PreviousPrice1 - Enter the Previous Price amount.
CostPrice1 - Enter the Cost Price amount.
PriceNote1 - Add a note against the Price value.
ValidFrom1 - Choose the date and time when this price will be on sale.
ValidTo1 - Choose the date and time when this price is to be removed from the Catalogue Item.
SecurityCode1 - Assign a content security to a price, meaning it will be visible to users which has the matching security.
SellOnlyInCurrencyCode - set the ISO currency code (Control > Commerce > Currencies) so that the catalogue item is only sold in that currency.
MaxQuantityLimit - Use this column to set a limit on how many of these items each customer can purchase; e.g. 1. if you enter '0', it denotes no limit on the item.
CouponsAndDiscountsYN - Allow Coupons and Discounts to be assigned to this Catalogue Item. Boolean value (0 null. 1 true).
SpecialOffersYN - Make the item a Special Offer. This will apply the Special Offer Image overlay (from the Store Profile) to the product image. Boolean value (0 null. 1 true).
PaymentMethod - Set the Payment Method to be used on this Catalogue Item. Note: This is required if the item is to be added to a Product Group. If left blank, all available Payment Methods will be displayed on the Checkout (for items not part of a Catalogue Group).
TradingZone - Set the Trading Zone (Control > Commerce > Trading Zones) to be applied to this Catalogue Item. If left blank, the currency will be automatically worked out based on the address of the customer.
ShippingYN - Enable Shipping Costs to be assigned to this Catalogue Item. Boolean value (0 null. 1 true).
ShippingStatus - Enter Shipping Status text for delivery; e.g. Ships Now, or Shipping in 24 Hours.
GMCShippingPrice - Short for Google Merchant Centre Shipping Price. Define a shipping price to export to Google Merchant Centre, this will have no effect on the actual shipping price which is defined by the relevant shipping profile.
Weight - Enter the weight of this Catalogue Item if applicable. Weight Units are set on Store Profiles, Kilograms tends to be the default value. If not applicable, set it to 0.
InventoryYN - Enable Inventory Management on this Catalogue Item. Boolean value (0 null. 1 true).
StockLevel - Enter the number of units you have in Stock for this Catalogue Item. If not applicable, set it to 0.
StockLocation - Enter in a location for this stock item.
NonAvailabilityStatus - Enter Availability Status for Catalogue Item.
RelatedGoodSubscriptionPlanCodes - The subscription plans related to the catalogue items via the goods area. If multiple, separate each value with a | (pipe character). Values to set: Subscription Plan Codes.
EnableSubscriptionYN - Enable this catalogue item as a subscription (0 null. 1 true)
DeferredIncome - Select an option if the value of this item is to be spread across the subscription period and to be calculated in the Deferred Income Export. This will only work in conjunction with the Subscription Duration field in one of the following combinations: Monthly / Bimonthly / Quarterly / Biannually.
SubscriptionPaymentDuration - Set the payment period for the subscription over the course of the year (Hours, Days, Weeks, Months, 3 Months, 6 Months, Years, Fixed Date) This also determines the length of the paid subscription
DurationNumber - Enter the duration units with reference to the above Subscription Payment Duration, e.g. 12 monthly payments, 4 x 3 month payments, 1 yearly payment.
FixedDate - Set the Fixed end date for the subscription duration
AllowDifferentStartDateYN - Set to allow the purchaser to select a different subscription start date (0 null. 1 true). A date field will be displayed on the basket screen.
CaptureContactDetails - Choose an option to assign contact details with the Order Line Item. This means that customers can add Contacts to the order (based on quantity purchased, a specified quantity or unlimited contacts), particularly useful for managing event delegates or course participants. By default, customers will be required to fill in Contact's First Name, Last Name and Email post-purchase or through their My Account screen. Values: 1 By Quantity Purchased, 2 By Quantity Specified, 3 Unlimited.
NumberOfContacts - Please enter the number of contacts to assign for this catalogue item. This field is only relevant if you selected By Quantity Specified in the previous column.
CaptureAdditionalDetails - Select to capture additional details of the Contacts. Values: 1 Job Title, 2 Company Name, 3 Business Phone, 4 Mobile Phone, 5 Special Dietary Needs, 6 Disability Requirements.
CustomField1, CustomField2, CustomField3 - Enter custom label to request further information about the Contact.
CaptureContactList - If set, enter the Contact Lists Code to add assigned Contacts to. Contacts will only be added to the Contact List once you Create Contact or Merge Contact on the Attendees management screen.
CatalogueGroupCodes - list of Catalogue Group Codes (pipe-delimited)
PaymentMethod - the Payment Method Name
TradingZone - the Trading Zone Name
ProductMessageYN - Enable this to allow for customers to add a custom or predefined message at the checkout stage. Boolean value (0 null. 1 true).
AllowUserCancellationYN - Enable users to cancel attendance only on free bookings or bookings made using Event Credits (0 null. 1 true)
CancellationCutoffDays - Enter the number of days prior to the event start where users can cancel their attendance. This is calculated against the Event Start set on the Article.
AcknowledgementMessage - Enter a short message or instruction displayed on the Acknowledgement screen for users who purchase this item. This may be useful for adding a link to a certain screen after purchase.
ISBN - Enter the ISBN (International Standard Book Number) for the product.
ASIN - Enter the ASIN (Amazon Standard Identification Number) for the product.
EAN - Enter the EAN (European Article Number) for the products.
UPC - Enter the UPC (Universal Product Code) for the products.
GTIN - Enter the GTIN (Global Trace Item Number) for the products.
StoreCreditMultiplier - Set the multiplier for the Catalogue Item. This will allow some items to have double / triple credits allocated, as well as having exemptions which have no credits (Values: 1 - 10)
CatalogueAttributeProfileName - If set up, Select the Catalogue Attribute Profile.
RelatedGoodMediaItemCodes - The media items related to the catalogue item via the goods area.
If multiple, separate by a | (pipe character). Values to set: Media Items Code.
RelatedGoodCatalogueItemCodes -
SaleStart - Choose the date and time when this item will be on sale.
SaleEnd - Choose the date and time when this item is removed from sale.
OnSaleYN - Option to put this Catalogue Item On Sale.
Boolean value (0 null. 1 true).
SectionName - You can set a different Section per entry. This will overwrite the Section set on the import screen.
SectionScreenName - Alternatively, you can use the Section Screen Name to match the Section. This is useful when you have multiple Sections with identical names.
MultiDisplaySectionName - You can set different Multidisplay Sections per entry. This will overwrite the Multidisplay set on the import screen. If adding multiple sections, use vertical bar character to separate them '|'.
ArticleScreenName -
SO - Short for Sort Order. If not applicable, set it to 0.
Teaser - A small description of the Catelogue Item. This will be displayed on listings pages and design elements. The length is unlimited on the control side but it is best to keep this short.
Introduction - Include an Introduction text which would sit below the Title or Main Image, depending on Presentation Style. Worth noting, this won't be displayed on listing page or Design Elements.
PopUpImage - Insert media source of Pop-up Image that you wish to use for this Catalogue Item.
PopUpImageAltText - Here's where you input the alt text that you wish to go along with the Pop-Up Image.
Thumbnail - Insert media source of Thumbnail that you wish to use for this Catalogue Item.
ThumbnailAltText -
IntroImage - Insert media source of Intro Image that you wish to use for this Catalogue Item.
MainImage - Insert media source of Main Image that you wish to use for this Catalogue Item.
MainImageAltText -
MainImageAlignment - Set the Main Image alignment. Left 1. Center 2. Right 3. If not applicable, set it to 1.
BaseImage - Insert media source of Base Image that you wish to use for this Catalogue Item.
BaseImageAltText - Here's where you input the alt text that you wish to go along with the Base Image.
MainDetails - Full details text of the Catalogue Item.
AdditionalInformation - Additional information for the Catalogue Item which can be separated from the Main details text.
SpecialOffer - Special Offer text.
Text4 - Additional text field.
Image2, Image3, Image4 - Additional images options.
Image2AltText, Image3AltText, Image4AltText - Alt text to the corresponding image.
StepByStepTitle - If you are introducing Articles steps, you have the option to invlude a title before the steps blocks.
Credits - Normally used to give credit to photographer or Stock Photo Agencies.
CodeBox (Deprecated) - No longer available.
Link -
KeyWords - Include keywords that you wish to tag your Catalogue Item. Separate multiples keywords with a vertical bar character. '|'.
PageTitle - If you wish to have a different Meta Title. By default, this is generated by the Catalogue Item Name.
PageDescription - If you wish to have a different Meta Description. By default, this is generated by Teaser.
ArticleAttributes - Enter that you wish you have on this Catalogue Item.
ArticleIcons - If you have set Article Icons in Affino, include file path for icons.
ArticleTypes -
ManufacturerID - If available, introduce the Manufacturer ID.
Brand - If available, introduce the Brand.
Manufacturer - If available, introduce the Manufacturer name.
DateOfManufacturer - If available, introduce the Date of Manufacturer.
PlayingTime - If available, introduce PlayingTime.
Languages - If available, display languages.
Format- If available, display languages.
CountryOfOrigin - If available, display Country of Origin.
Version - If available, display version.
EventStart - This attribute is used on Event Presentation Styles. Add an Event start date and time.
Format: Date and time. e.g. 12/12/2016 18:00:00.
EventEnd - This attribute is used on Event Presentation Style. Add an Event end date and time.
Format: Date and time. e.g. 12/12/2016 18:00:00.
EventLocation - This attribute is used on Event Presentation Style. Add the event/seminar location.
EventRecurrenceType - This attribute is used on Event Presentation Style. Set the event recurrence type. 1 One-off. 2 Weekly. 3 Every 3 Weeks. 4 Bimonthly. 5 Annually. 6 Daily. 7 Fortnightly. 8 Monthly. 9 Every 6 Months. 10 Biannually. 11 Custom.
EventNumberOfRecurrences - This attribute is used on Event Presentation Style. Set the number of recurrences. Values from 1 to 52.
RelatedArticleCodes - This will relate articles to the product article using the ArticleCode
RelatedArticleScreenNames - This will relate articles to the product article using the Article ScreenName
CreatorFirstName -
CreatorLastName -
CreatorEmail -
Security - You can set a Security Clearance. This will overwrite the Security Clearance set on the import screen.
PresentationStyle - Set which Presentation Style you wish to use per entry. For now, we only support Responsive Product, Simple Event, Advanced Event and Advanced Product presentation styles.
LiveYN - Set the related product article to Live (0 null. 1 true)
ArticleCode -
RelatedProducts - If you would like to relate it with an existing products, you can use their CatalogueItemCode.
CreditScale - Use this setting to set the multiplier for the Catalogue Item. This will allow some items to have double / triple credits allocated, as well as having exemptions which have no credits. Value from 0 to 10. If not applicable, set it to 0.
Media items/images
To add images to the image columns, you will need the Affino media file path.
Follow these steps to generate them:
Control > Media
1.- Go to the Media Centre and select the Add button to add a media item:
![]()
2.- Select the target media library section (Album):

3.- Click on the upload icon:

4. Select the files you wish to upload (this can be a zipped file containing multiple media items):

5. Run the media file path export task:
Control > Media > Media File Path Export

After the task is completed, you will receive a message with the link to the (XLSX) file.

The each record in the file will have the original file name and the Affino media file path to insert into the import template.

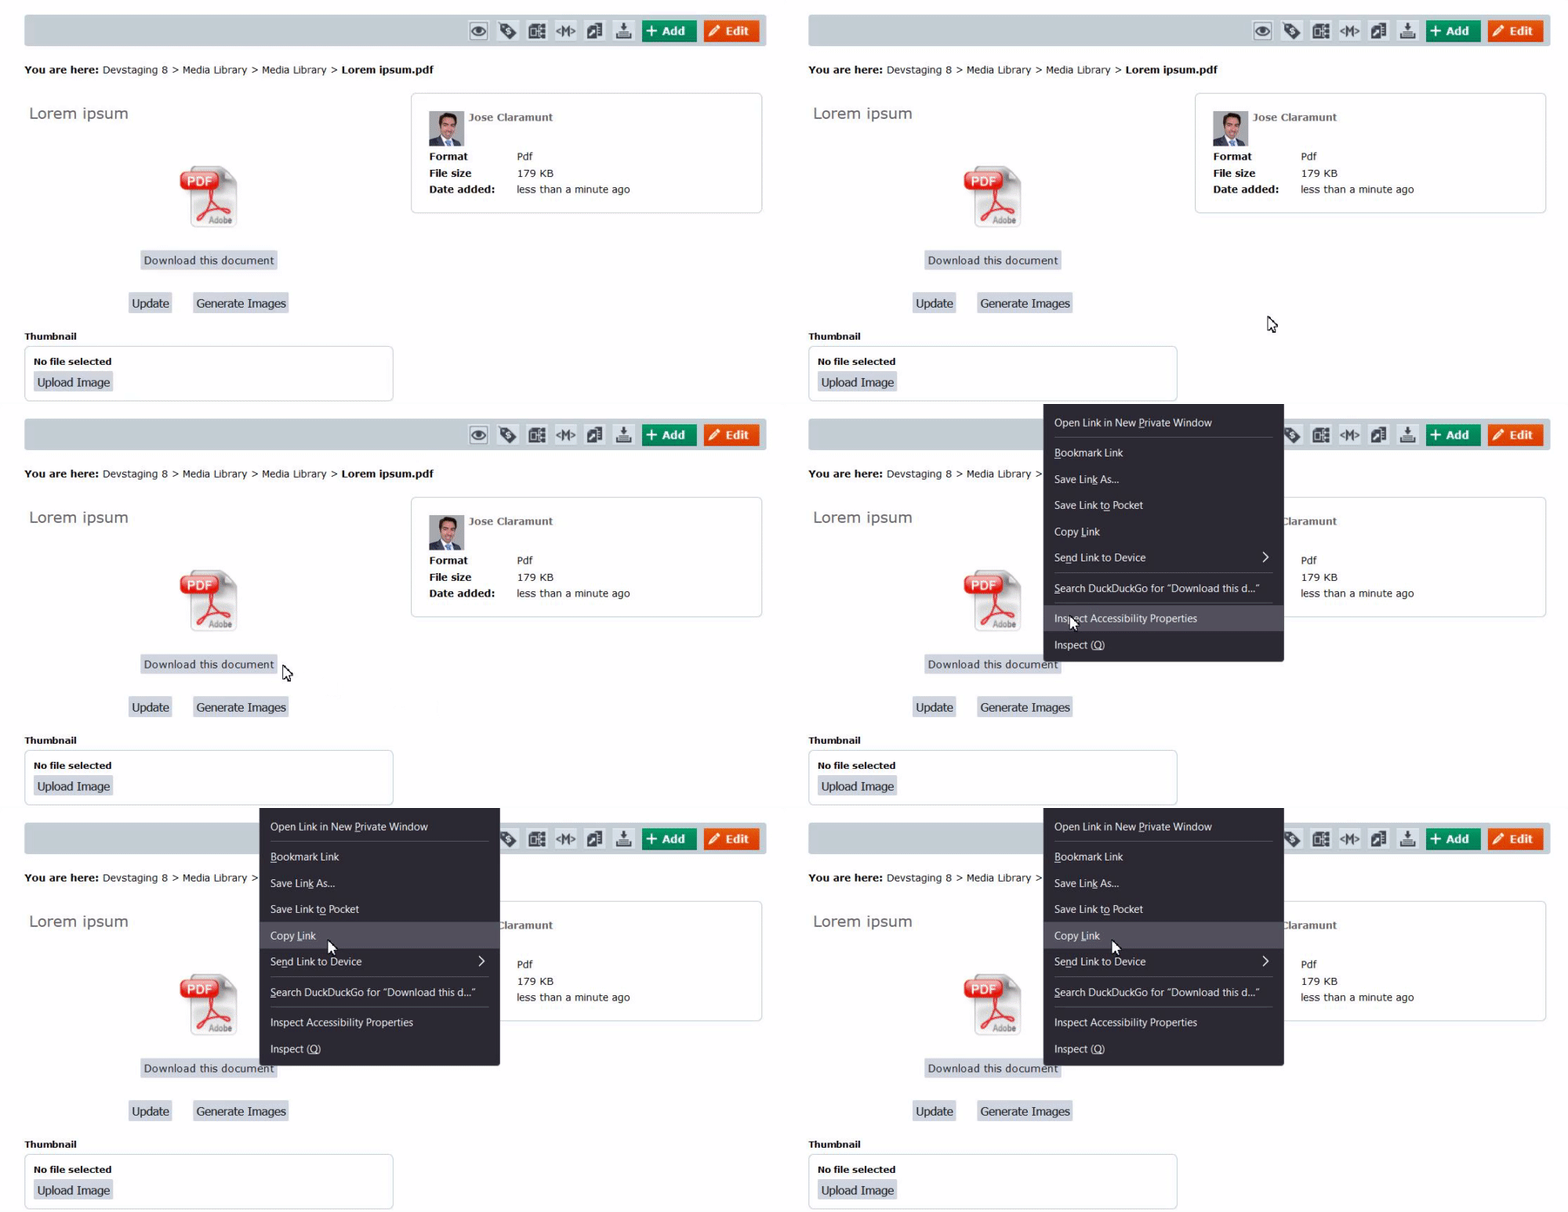
Note: if you want to obtain the media file path for just one item, you can right lick on the "Download this document" button and obtain the link/URL to the media item:

If you hover over the 'Download this document' link you can see the media file path (URL):

Example: /AcuCustom/Sitename/DAM/001/ (file name: Lorem_ipsum.pdf)
Did you find this content useful?
Thank you for your input
Thank you for your feedback
Meetings:
Google Meet and Zoom
Venue:
Soho House, Soho Works +
Registered Office:
55 Bathurst Mews
London, UK
W2 2SB
© Affino 2024


