Google Analytics Profile

Overview
Back a long time ago, Google Analytics used to be applied to Affino Skin Headers and Footers using Design Scripts. For several years now though it’s been a Profile and Zone setting - meaning that you simply add in your Tracking code once and you can apply it to 1000’s of pages instantly and with minimum effort.
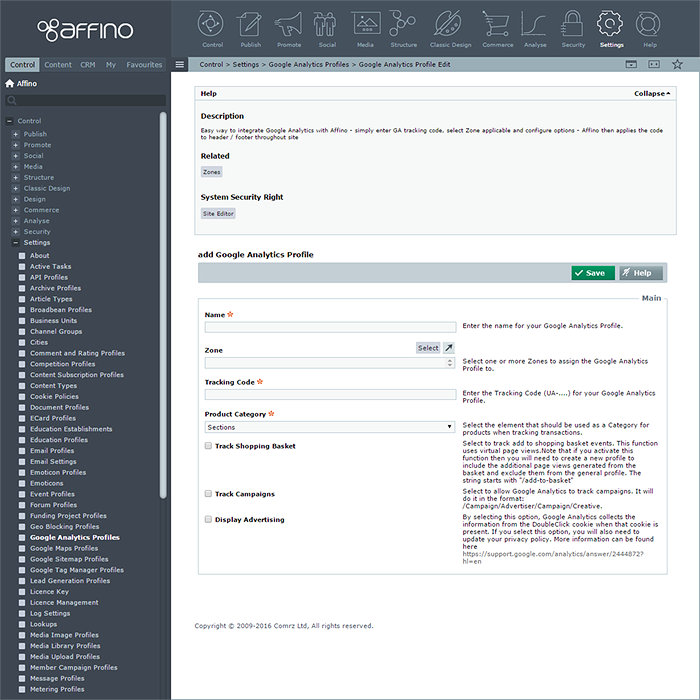
Google Analytics Profile sits under Settings and has 7 fields as follows:
- Name: Enter reference name for internal purposes only
- Zone: Select which Zone/s apply
- Tracking Code: Enter Google Tracking Code e.g. UA-1234567-8 (analytics.google.com)
- Product Category: Specify which content type applies: Sections | Channels | Catalogue Attributes (usually Sections)
- [_] Track Shopping Basket: Track Shopping Basket actions
- [_] Track Campaigns: Track Affino Advertising / Banners
- [_] Display Advertising: Track DoubleClick / Google Advertising on your site
Dependencies
There are really only two dependencies here really:
- Zone (Site Domain)
- Google Analytics Account / Tracking Code
Uses
Simply put, this allows you to track activity on your site and analyse it using Google Analytics; this simple Settings Profile gives you the easiest means of employing Google Analytics on your website.
Advisory Notes
You need to set up a Google Analytics Account, then go to Settings (www.google.com/analytics/settings) and set up a ’Website Profile’. Once you do this, you should see a 10 digit tracking code starting with UA; e.g. UA-1234567-8 next to the Domain URL entered. This is the Tracking Code you need for Affino - as below. Google Analytics will then track activity on the defined domain and allow you to run analysis.
Using Google Analytics
Affino integrates with Google Analytics in great depth. As well as allowing for real-time tracking, it provides additional information to GA for:
- Shopping Baskets
- Checkouts (including products sold and value)
- In-site Searches
- Newsletter Message Click-throughs
Affino is also optimised to allow you to set up hooks within it so that almost any activity can be tracked. This means that you can track virtually any interaction whether it’s a form submit, each stage of the checkout or a registration.
When the Track Shopping Basket option is selected you will get considerable insight directly from GA on transactions, revenues, conversion rates, average sales value, quantities and much more. You can however go a step further and set up Goals to track the steps through to the conversion using GAs Funnel Visualisations.
Example Goals
In Google Analytics, go to Admin, then select the site you want to set up a Goal for.
Select the Goals tab, then click + Goal on the first Goals set to get started with adding Goals.
Add to Basket
There are lots of options presented when adding a goal, the following are the essential details you need to enter in, just leave the other options with their defaults.
- Goal Type: URL Destination
- Goal URL: /add-to-basket
- Match Type: Head Match
Registration
- Goal Type: URL Destination
- Goal URL: /registration?dKey=Demographic
- Match Type: Exact Match
- Goal Funnel: Ticked
- Step 1 URL: /registration
Note: The screen name for the Channel is Registration, if you have it as something else then simply change the GA settings to match. You can also use whatever Step Name you wish.
Purchase
- Goal Type: URL Destination
- Goal URL: /checkout\?ordercompleted=1
- Match Type: Regular Expression Match
- Use Funnel: Ticked
- Step 1: /checkout\?CartAction=Checkout
- Step 2: /checkout\?CartAction=Registration.*|/checkout?CartAction=Checkout&Login=Done
- Step 3: /java-bin/ValCard
Note: Checkout is the Screen Name for the Checkout channel. Note that Step 3 is an example only, and is the payment gateway URL for the 3rd party payment gateway. You might have a different URL for other payment gateways, or simply leave out if using an in-page Payment Gateway.
Other Types
Once you’ve got the logic figured, it’s a case of tracking down the relevant URLs / Headers to be able to set up any other form of conversion tracking.
Troubleshooting
- Very simple really, it either works or it does not - as long as you have the correct Tracking Code - it should just work
- There is some slight nuance in tracking within Google Analytics, and that involves as much setup work as you're willing to engage in - just tracking the various Affino URLs detailed per key function above
Did you find this content useful?
Thank you for your input
Thank you for your feedback
Meetings:
Google Meet and Zoom
Venue:
Soho House, Soho Works +
Registered Office:
55 Bathurst Mews
London, UK
W2 2SB
© Affino 2024


