The Accounts Channel Guide

Overview
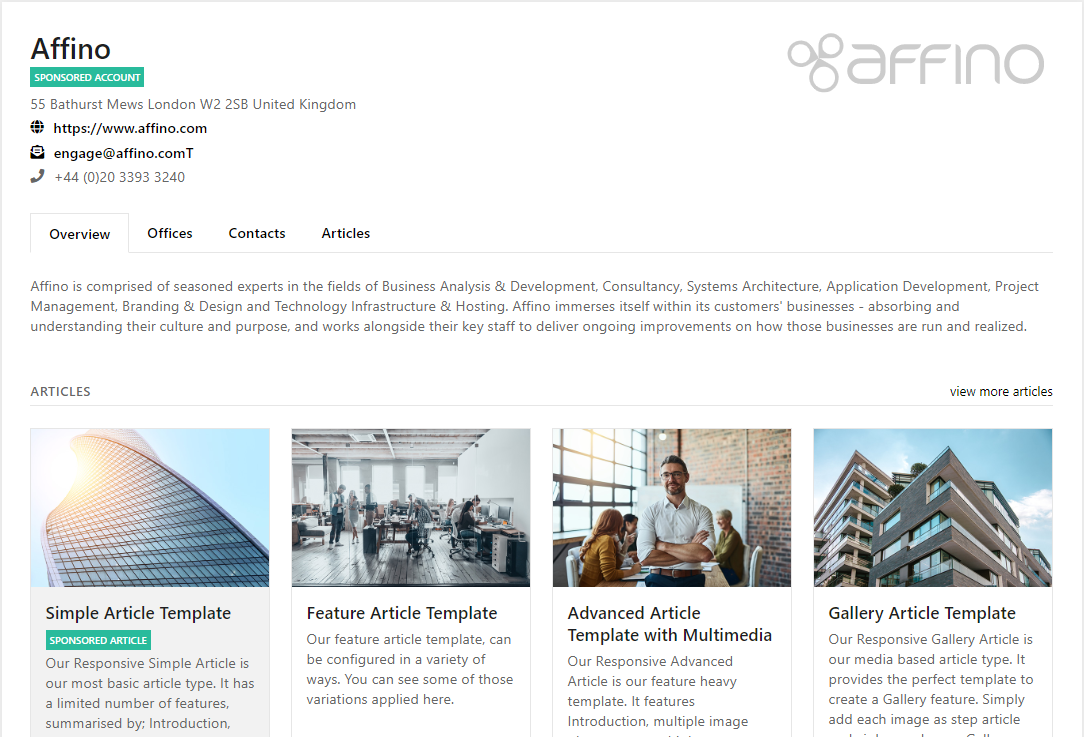
We have introduced a way to showcase Company directories, surfacing companies, their offices, contacts, featured articles (including directory entries) and call to action directly from the CRM through to the live sites.
There are a great number of controls in place to ensure the optimal presentation of the content, and the ability to rapidly update any information, live / non-live status and much more on the fly.
We have made it possible to set Accounts as sponsored, to provide highlights and the full breadth of information they would want to present for repetitional marketing.
You can see this in live action here: demo.affino.com/accounts
Set up the Accounts Profile
Firstly, start by creating an Account Profile. This is where you configure the listing and detail template.
Control > Security > Account Profiles
Here are some of the key fields, with help text, that you will need in order to configure the Account Profile:
Main Panel:
- Name -Enter in an identifiable name for this profile, e.g. My Site Account Profile.
- Contact List - Select the Contact List used to list the accounts, offices and contacts on the accounts listing and detail tabs. Additionally, the Contacts within this Contacts List will appear on the Overview tab as Featured Contacts on their respective Account profile page.
Lisiting Panel:
- - Select to display a search bar allowing you to search Accounts by Name.
- Show A-Z Filter - Select to display A-Z filters on the Account listing screen.
- List Parent/Child Accounts - When listing Accounts on the Account channel, it is possible to select to either list all accounts, just the parent accounts or just the child accounts. This is useful is for example showcasing just the main brands, or listing out regional offices, dealers, or branches.
Options: Show All | Show Top-level Parent Accounts Only | Child Accounts Only on the listing page
Detail Panel:
- Tabs - Select the tabs to be displayed on the Accounts detail tab, options:
Overview | Offices | Contacts | Articles | Product | Directory | Video | Audio | Link |
- Scoped Topic Filters - Select up to 2 filters for filtering contacts on the Overview tab. These will override the Scoped Topic Filters setting on the Section. The first filter will be used to segment the lists of contacts in the Contacts tab.
- Article Section - Select the Section to list articles on the Account detail screen.
- Link - Add a link to the Account Detail tab. This is a generic link for all Accounts and can be used as a call-to-action or link to the Account main page for instance. The link text can be updated on the Text Item.
- Show Message Account (All) - Select to show the Message Account button across all Accounts. Please note that by selecting this, it will override the individual Message Account option from the Account control screen.
- Message Account Security Clearance - Select the Content Security Right to view this button. Only users with this security clearance will see this button if it is turned on for the individual account or for all accounts.
- Social Icons - Select and reorder the social icons. This will be reflected on the Account detail screen.
- Pass Through Primary Contact And Account To Dynamic Form -
If you have a Dynamic Form link on the Link field above, you can select this option to pass through the Primary Contact and the Account Name to the Dynamic Form. If you have an Account field type, this will prepopulate the Account Name. As for the Primary Contact, they will receive a form entry email notification once the user submits the form.
Office Tab panel:
- Use Postcode Finder - Select to use the Postcode Finder in the Office tab. This will allow users to find the closest Account based on their Postcode.
- Hide Contacts - Select to hide contacts from child accounts showing under the office tab.
- Hide Tab If No Child Accounts - Select to hide the Office tab if the Account has no Child accounts.
- Display Account Title - Select which title to use for the child accounts. Options:
City / Country only
Public Name / Account Name + City / Country
Public Name / Account Name only
Message Account panel:
- Subject - Enter the Subject for the Message Account. This text will be pre-filled on the Subject field on the My Message screen.
- Message - Enter the Message for the Message Account. This text will be pre-filled on the Details field on the My Message screen.
Create a Channel
Once you have set the Account Profile, you will need an Account type Channel. Please note this is different from the My Account type Channel.
Control > Structure > Channels
When creating the Channel, associate the Account Profile with the Channel on the Account Profile field.
How to make an Account Profile Public
Control > Social > Accounts
Here are some of the key fields, with the help text, that you will need to configure in order to make the Account Profile public and which attributes reflect on the display side.
Public Information panel:
- Public -Select to allow this Account to be listed publicly on the Account Listing and Search channels.
- Public Name -The Public Name is shown on the Display side when listing out account information, e.g. on Recruitment Briefs. If blank, Affino will use the Name instead.
- Teaser - Enter the teaser information for this Account, displayed on the Account channel listing.
- Description - Enter a description for this Account. This is used on the Member Accounts channel.
- Sponsored Account -Select to highlight this account on the Accounts Listing channel.
- Message Account - Select to show a Message Account button on the Account Detail page. If this Account is a Child Account, then the Message Account button will also show under the Offices tab. Please note, if you have Show Message Account (All) selected on the Account Profile, then that will apply across all Accounts, despite if you have this setting selected or not.
- Hide From Site Search - Use this option to hide individual accounts from the Site Search. If selected, the account is not shown on the Site Search (althoug it can still appear in specific public account listings).
Select to hide the following from the Account screen, including on the Offices tab if this account is a child account:
- Hide Logo - Select to hide the Logo from the Account screen, including on the Offices tab if this account is a child account.
- Hide Telephone - Select to hide the Telephone from the Account screen, including on the Offices tab if this account is a child account.
- Hide Email - Select to hide the Email from the Account screen, including on the Offices tab if this account is a child account.
- Hide Website - Select to hide the Website from the Account screen, including on the Offices tab if this account is a child account.
- Hide Social Icons - Select to hide the Social Icons from the Account screen, including on the Offices tab if this account is a child account.
Select to hide the following tabs from the Account screen:
- Hide Overview Tab - Select to hide the Overview tab from the Account screen.
- Hide Offices Tab - Select to hide the Offices tab from the Account screen.
- Hide Contacts Tab - Select to hide the Contacts tab from the Account screen.
- Hide Articles Tab - Select to hide the Articles tab from the Account screen.
- Hide Product Tab - Select to hide the Product tab from the Account screen.
- Hide Video Tab - Select to hide the Video tab from the Account screen.
- Hide Audio Tab - Select to hide the Audio tab from the Account screen.
- Hide Directory Tab - Select to hide the Directory tab from the Account screen.
- Hide Link Tab - Select to hide the Link tab from the Account screen.
- Twitter ID - Enter your account Twitter ID.
- Facebook Page - Enter in the account's Facebook URL.
- LinkedIn Page - Enter in the account's LinkedIn URL.
- Featured Contacts - Select the Contacts to be featured on the Accounts channel, Overview tab, filter this list by those that are selected on Contacts field.
- Link To Account Detail From Offices Tab - Select to link to the Account Detail screen from the Offices tab, if this account is a child account.
Please note that the following will be reflected on the Account Profile too:
- Address (all fields involved with the Address)
- Telephone
- Website
Offices search using Postcodes
We have added the option to search for offices using Postcodes on the Office (dealer) tab on accounts.
This works for all UK postcodes (excluding Northern Ireland).
When enabled, it shows the closest offices to the user’s location. The postcode is pre-filled if the user already has an address, and if not, then the postcode they enter is automatically applied to their record.
Offices are then listed with the nearest ones on top, showing how many miles away they are.
This is all managed on the Account Profile and within each individual account record.
On the account record, you can select to enable on all accounts, and set the security clearance required by each user to do so.
- See step 1: Set up the Accounts Profile (Office Tab panel)
Display > Account Detail > Offices Tab
The Postcode setting allows users to find the closest Account based on their postcode.
* This needs to enabled via the Account Profile.
We have 2 scenarios:
1.- For logged out users or users who don’t have a postcode in Affino
2.- For logged in users who have a postcode already on their record
Users will see the Child Accounts details differently depending on the above.
Logic:
If the Account Profile has the Use Postcode Finder field checked, show the following.
- If they are a guest user or a logged-in user without a Postcode against their record, they need to enter their Postcode on the Postcode Field
- If they are a logged-in user with a Postcode on their Main Address, Affino will prefill their postcode stored against their record. They can delete and enter a new one.
Once a Postcode is in place, order the Accounts by closest and display the distance against each account.
* The text that appears above the postcode field "Enter your postcode to find the office closest to you" is a Text Item (which can be edited via the App Bar)

This is how Child Accounts appear to guest users or logged in users with no postcode:

This is how Child Accounts appear to logged in users with a postcode (in the results view):

Directories linked to Accounts
Account pages and Directory pages are now linked.
Accounts can be accessed via the Directory page and vice versa.
Example:
From the Account Directory page, if a user clicks on "View Company Profile"

- they will be taken to the Account page (where the accounts' brand assets reside).

Clicking on the Directory tab, then the directory thumbnail, will take the user back to the account directory page.

How to link a directory to an account
When a directory does not have an associated account is appears as so:

In order to associate a directory to an account you must:
- Access the directory via the control side
- Scroll down and locate the Publication panel
- Within the panel you will see the Account field
- Click and select the desired account

- Once selected, save the directory
- The account is now associated with the directory.
As you can see, the View Company Profile button is now displayed:

This new button will enable you to click through to the account:

Account related Articles
All articles related to an account can be accessed tagged directly with the account:

How to link an article to an account
Just as we associate a directory to an account, we can associate an article to an account.

- Access the article via the control side
- Scroll down and locate the Publication panel
- Within the panel you will see the Account field
- Click and select the desired account

Once selected, click Save.
The article is now associated to the account:

Audio and Video

Video and Audio are tabs can be made available on the account screen via the Account Profile:
Control > Security > Account Profiles > (Ad/Edit) > Detail panel: Tabs

The Video and Audio tabs will be populated via the Media Item Account field:
Control > Media > Media Items > (Add/Edit) > Publication panel: Account

If Media Item has a matching account, then the type of media will be shown under the respestive tab:
- Type: Video (shown under Video tab)
- Type: Audio (shown under Audio tab)
Note: Both Video and Audio tab are text items that can changed via the Application Bar.
Page Analysis
Clients can analyse how each account screen is performing and how much traffic they are diverting to their site or contact points.
This is done through the Page Analysis tab: Control > Account > Page Analysis
Page Analysis showcases the full set of usage stats on the account page, including the views chart, recent account and users, and referring URLs.
The Clicks panel displays the following stats:
- Email Clicks: when a user clicks on the email address link on the Account detail screen
- Website Clicks: when a user clicks on the website link on the Account detail screen
- Offices Tab Clicks: when a user clicks on the Office tab on the Account detail screen
- Custom Tab Clicks: when a user clicks on the custom tab on the Account detail screen

Clicks are tracked from the current month and the previous 12 months.
The Stats panel captures the following:
- Total Impressions
- Impressions: Per Day
- Impressions: Last 12 Months

Also present in Page Analysis are the Recent Viewers and Referring URL's:

Note: If an Account has not been viewed, the Page Analysis tab will not be displayed.
Did you find this content useful?
Thank you for your input
Thank you for your feedback
Meetings:
Google Meet and Zoom
Venue:
Soho House, Soho Works +
Registered Office:
55 Bathurst Mews
London, UK
W2 2SB
© Affino 2024


